RentCafe Guide for Housing Choice Voucher Program Participants
- Go to portal.mphaonline.org and select ‘Resident Login’ along the top bar. Depending on the size of your screen, it will either be in the middle or on the top right.
- Once there, find where it says ‘Click here to register’ in bold red letters and click that text.
- Enter the registration code provided to you by MPHA in your registration letter. It will begin with 9682-Tt followed by seven numbers.
- If you do not know your registration code, please contact MPHA either via email at hcvwaitinglist@mplspha.org or call (612) 342-1975.
- Enter your legal name, your full Social Security Number, and the best phone number at which to reach you.
- Then scroll down to the Account Information section. Enter the best email address at which to reach you. If you do not have an email address, you may create a new one for yourself or use an email address of someone whom you know and trust, such as your child or sibling, provided you have their permission to do so.
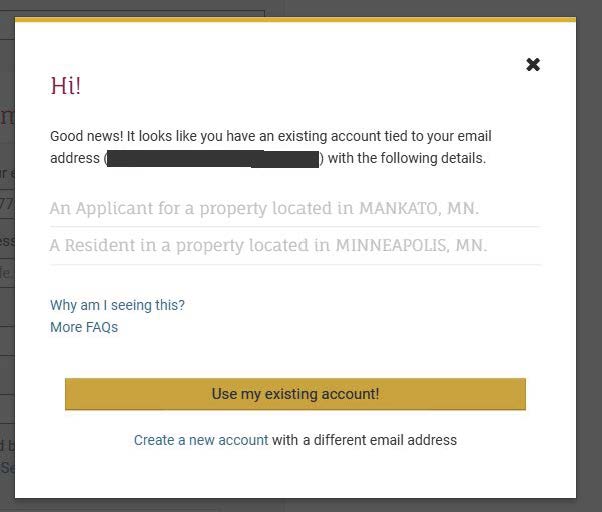
- If you enter your email of choice and receive a pop-up box stating that your email is already in RentCafe, you will need to click the ‘X’ to close it and try a different email address. This pop-up means that the email you tried has already been used somewhere else in RentCafe and cannot be utilized a second time. This could be because you have applied to a different Public Housing Agency in the past, having an existing RentCafe account where you pay your rent, or having a current or former landlord who uses RentCafe to manage their tenants. Keep trying different emails until you no longer get this box. If all of your emails are already in RentCafe, you will have to create a new email for yourself.
- Next, you will create a password for your MPHA RentCafe portal account. This is not asking for the password to your email account, although some people choose to reuse passwords. MPHA will not have access to the email account associated with your MPHA portal.
- When you are done filling in your personal information, click the grey box that reads ‘Please read and accept the Terms and Conditions’. Then click the yellow ‘Accept’ button.
- Your last step is to click ‘Register’.
- If you see a beige bar that says processing, your account is loading. If you get a red bar, go back and correct any mistakes before trying again. When your account is created, the bar will turn green before bringing you to your MPHA RentCafe portal homepage.
- Confirm that the top bar says your name and address. If your details are correct, then you are successfully registered!
- Go to portal.mphaonline.org.
- If you have already registered before, then scroll down to the bottom of the Resident Services page and log in with the email and password you set for your MPHA RentCafe account.
- Once you enter the RentCafe portal, find the Certifications button on your homepage.
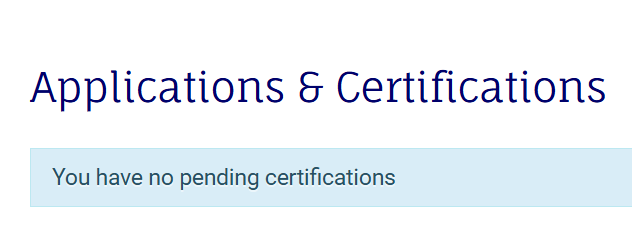
- If you receive the following message, please contact your MPHA caseworker:
- Once you see the welcome message, select the ‘Next’.
- Household members: Confirm the number of household members in our system matches the number of people in your household.
- Deleting a household member: To remove a household member, click ‘Delete.’ They will now appear crossed out. Anyone who is no longer part of the household or who has been gone from the household for longer than 3 months (such as being out of the country for an extended period of time) should be removed unless approved by MPHA. They may be added back upon their return unless otherwise stated. Consult your tech or caseworker in each instance. Once your Annual Recertification is completed and pending approval, this action can only be undone if you provide documentation to re-add this household member back into the household, so please only delete someone if necessary.

- Adding a household member: Select the ‘Add Household Member’ button if needed. If you add household members to your recertification form, be sure to provide as much accurate information as you are able. Only the fields marked with the red asterisk (*) symbol are necessary and must be provided to continue completing your Annual Recertification. If you do not know someone’s Social Security Number and/or birthdate, reach out to your caseworker for guidance as you will be unable to add them without this information. This is especially important if you are adding a Live-In Attendant.
- Mandatory questions: The questions required are determined by household members’ age and student status. As you fill in fields, more questions may generate and require answering in turn. If you complete your Annual Recertification via computer or tablet, be sure to check both columns for new questions as the bottom of the lefthand column leads to the top of the righthand column. For non-student adults, there are only four mandatory questions beyond their already filled-in demographic information:
- If you have ever changed your Social Security Number and/or legal name, please list any alternate numbers and names under which you have also been known, whether you have been the victim of identity fraud, have a maiden name, or anything else. It is not necessary to list nicknames.
- If someone cannot read and write in English, please also mark that they do not have a 24/7 interpreter so that we know to hire an interpreter when calling or meeting with this individual. If they can speak English but cannot read written communications, then specify that in the Notes section. Please also list what language/s someone speaks if the dropdown menu does not include their preferred language.
- Confirm that every household member’s citizenship status is correct as some people will be automatically marked not a U.S. citizen due to a system default. If you are a US citizen or national but were marked incorrectly, you will have to list yourself as an immigrant even if you were born in the United States in order to progress. Feel free to explain this discrepancy in the Notes section if you want to, although it will also be covered by the birthplace question.
- If you are a permanent resident and do not know your Alien Registration Number, also usually called a green card number, type in 999999999 (nine 9s) as a placeholder number to progress. MPHA can update this information once you have located and confirmed your actual green card number.
- Children:
- Any household members marked Youth<18 will be asked what their relation to their parent or guardian is, with answers listed in alphabetical order.
- All minors 0–17 years old will be asked if someone in the household has 50–100% custody of them.
- All minors 0–16 years old will also be asked if at least one of their parents or guardians lives in this unit as well, and if so, who will sign for them.
- All minors 0–5 years old will be asked if they have had their blood tested for the presence of heavy metals like lead. If this sounds unfamiliar to you, mark No. If you know that this child has had this blood test done, then please answer the subsequent questions to the best of your ability.
- All minors 15 –17 years old in the household must list their student status. If they are not currently attending school, list them as Not a Student and answer the additional questions that generate.
- For any students in the household who are 18 or older, make sure they are listed as Student18+ under the Relationship to the Head of Household* mandatory question.
- All students, whether they are Full-Time or Part-Time and regardless of age, will be asked to provide which school they attend. If you are unsure where they are attending and cannot confirm, provide as much detail as you can and correct or notify MPHA later.
- Review and confirm: Once all additional household members have been added to or deleted from your household as appropriate, select the ‘Review and Confirm’ button for everyone else.
- Correct information for each household member. The grayed-out fields with personal identifying information such as your legal name, date of birth, social security number, and legal gender cannot be edited in the MPHA RentCafe portal. Please contact Minneapolis Public Housing Authority if the information in any of these fields is incorrect so that we may fix it for you.
- You can tell that the system accepted your checks and edits if the ‘Review and Confirm’ button changes to ‘Edit’. Once all members of your household are listed, anyone who is not or no longer a household member has been deleted, and all information has been double-checked, you may move on to the next section.
- Emergency contact: Optionally, you may provide an emergency contact for your household. Example emergency contacts can be extended family members, close friends, external caseworkers, or anyone else whom you trust. This person is whoever you would want MPHA to contact on your behalf if we are unable to reach you directly.
- If you do not want to add an emergency contact, skip to the next section.
- If you do want to assign an emergency contact, please provide their name, phone number and/or email address, and select at least one reason for contact (such as if MPHA is unable to reach you or in emergencies).
- Once you finish adding your emergency contact, if any, select next to continue to the next section.
- Income: Look at the sources of income already listed for your household and determine if anything is missing or incorrect.
- If you need to add an income source, click ‘Add Income’.
- If anything listed is no longer correct, such as a job you quit or benefits you no longer receive, click ‘Delete’ next to that source.
- For everything else, enter which member of your household receives this income and provide details about how much and how often this income is received. If you are unsure how to categorize your income, then check either the Income Type Definitions tab or the blue ‘Click Here’ link for more details. If none of these descriptions match, then select Other Income.
- If you don’t know how much your annual income is, you can change the time interval. The system will do the math for you.
- For Employment, one of the required questions asks when you began to work at that place of employment. If you do not remember exactly, then just guess to the best of your ability.
- You are required to list an address for Self-Employment. If you work from a specific physical workspace (such as owning your own clothing store), then put the address of your business. If you work without a set work location, such as a rideshare (Lyft, Uber) driver or if you work online, then put your home address instead.
- Type a Note if you need to clarify anything about your source of income. For example, if you work during the school year rather than year-round, write that in the box.
- If you receive benefits from Hennepin County, please provide your case number.
- Assets: Next is adding your assets, if necessary. While we prefer that residents list everything they possess, it is mandatory for residents to list assets equaling the equivalent value of $50,000 or more. If you need help determining if your asset is necessary to list, please reach out to your tech or caseworker for guidance. Once you finish adding or reviewing and confirming all of your relevant assets, if any, click ‘Next.’
- Expenses: If you have relevant expenses (childcare for children 0–12, medical expenses for elders 62+ which exceed 3% of the household’s annual income, or otherwise-unreimbursed disability assistance expenses) to add to your Annual Recertification, select ‘Add Expense.’ Once all of your qualifying expenses are added or reviewed and confirmed, if any, click ‘Next.’
- Zero income: If you have nothing to add in the income category, you will receive a prompt to list out how you cover your living expenses. Common responses here include living off of previously-earned wages, financial support, or going without the listed utilities and items. If you receive regular and consistent support from family, your community, or an organization, please go back to the Income section and add that support as Gifts/Contributions.
- Member criminal history: The next section asks about the criminal history of everyone in the household.
- Click each dropdown box and choose the correct response to each question.
- If any household member has a misdemeanor less than 3 years old and/or a felony less than 7 years old on their record, select ‘Yes’.
- Safe and secure housing is a basic human need. Please answer honestly. The questions in this section are required by the Department of Housing and Urban Development and are mainly used for statistical purposes.
- If you have no current, pending, or past criminal convictions, then answer ‘No’ to the three questions in the righthand column as well.
- If you select ‘Yes’ to any questions, a small text box will then generate asking for further details. Please provide brief context such as the offense and year of sentencing if relevant.
- When each dropdown and any text boxes are answered, click ‘Next.’
- Final review and submission: Once you have entered and updated all of your household’s information, you will have a chance to review everything before continuing.
- The Error Check page is an opportunity for you to make sure that everything has been entered correctly. If there is an error to fix, it will either direct you to return to that previous section using the yellow ‘Back’ button at the bottom of the page or by clicking a gray ‘Add’ button along the right-most column.
- Once everything has been fixed, you should be able to click ‘Confirm’.
- Once the page tells you that there are no more errors, then you can continue with your Annual Recertification.
- Documents: Now that all of your household’s information is correct, the system will prompt you to provide documentation to support or supplement that information. The specific documents required from each household vary, but everyone has to provide the same overall types of documentation. Please see the below “How to upload documents” section on this page for detailed instructions on uploading documents.
- Income documents:
- Anyone who works will need to provide their three most recent consecutive paystubs. If you have not been working at your job long enough to have earned three paychecks, then provide as many paystubs as you can and submit them to MPHA along with a letter from your boss or manager. If you are planning on leaving that job soon, be sure to let your MPHA case worker know as soon as possible.
- If you are self-employed, please provide your most recent 1040, your schedule C, and the schedule C calculation pages from your tax documents.
- If you are a rideshare driver for Lyft or Uber, please provide your three most recent consecutive monthly summaries.
- If you receive SSI or SSDI, Social Security, General Assistance, or Hennepin County welfare benefits (such as SNAP or food stamps, TANF, or Public Assistance), please provide your most recent award letters or MAXIS reports. Pictures of bank deposits will not be adequate.
- If you receive child support through Hennepin county, please provide the official statement from the county. If you receive it directly from a child’s parent, please get a signed letter from that parent which includes their name, the name/s of the child or children whom they support, and the amount they provide to you.
- If you receive assistance from family, your community, or a non-governmental organization, please provide letters from those who support you with their name, your name, the amount and/or manner in which they support you, and how frequently they provide that assistance to you.
- If you obtain your household’s funds through another means, or if you have any questions, please reach out to your MPHA tech or caseworker.
- Identity documents:
- If you added or re-added a new household member, MPHA will require you to provide their social security card, their birth certificate, and a government-issued photo ID such as a driver’s license, passport, or Alien Registration ID (aka green card).
- Students 18 years old and older need to provide proof of their student status with a transcript or class schedule which shows the student’s name and the number of credits they are taking, if relevant. Full-time student status is considered to be 12 credits or more unless you provide a letter from a professor or faculty member stating that you count as full-time in your program. If you are part-time, or unable to prove that you are full-time, then your income will be included with your household’s overall income. Please note that the full-time student income exemption is not available to those marked as either the Head of Household or Spouse.
- Income documents:
- Now is the final time to confirm that everything looks correct. If you are missing something, you can navigate back to the section you need with the yellow buttons. Once you have finished reviewing everything, please check the box at the bottom and click ‘Next.’
- Sign and submit: The final step in completing an Annual Recertification is to sign the Household Documents for each household member 18 or older and the Head of Household’s Member Documents. If the system prompts you to have someone 17 years old or younger sign the final page documents, please contact your MPHA tech or caseworker.
- Signatures: This section of the Annual Recertification process is the one that loads the slowest, so please be patient.
- The Disclosures & Consent screen will pop up asking if you agree to sign electronically. If the message doesn’t fit on your screen, you will have to scroll down until the ‘Agree & Continue’ button at the bottom turns from gray to blue and allows you to click it.
- You may draw your own signature and initials with the mouse (computer) or your finger (phone, tablet), or you can select the blue link to have RentCafe create a script signature for you to use instead.
- Make sure that the signatures match to whom they’re assigned. A common mistake is for one person to rush through the household’s Annual Recertification without reading carefully and accidentally drawing their signature for someone else in the household. If you accidentally save the wrong signature for a household member, please reach out to your MPHA tech or caseworker and let them know as soon as possible. The best way to prevent this from happening to make sure that everyone who needs to sign picks or draws their own signatures.
- Once you have successfully selected or drawn your signature, the next page to load will show you a form generating with the information you have previously provided during this Annual Recertification.
- To sign, press the yellow ‘Sign’ button and then the yellow ‘Date’ button. It will not let you enter the date first. You will know that the system accepted your signature if the yellow button turns teal and the text turns into a check mark.
- If there are more blanks that need to be signed, there will be a blue ‘Jump to Next’ button at the bottom of your screen which will take you directly to the next blank if you do not wish to scroll down yourself.
- Once the entire document is signed, the blue button with change to read ‘Sign & Complete.’
- Be sure to wait for the page to load and press the ‘OK’ button in order for the signatures to be saved.
- Then wait again for the Sign and Submit page to refresh itself before going to the next set of documents or it may not work. Wait until the ‘Click Here to Sign’ button changes to unclickable text reading ‘Signing Complete’ and the signatures show up when you view the document.
- Household Documents:
- If your household size is over 8 people, there is a chance that the Household Information section will not display all of your family members together. As long as everyone is correctly listed back in the Household Members section, this should be fine. Contact MPHA if you have questions or concerns.
- Confirm that your household’s income is listed correctly. Social Security will sometimes be listed twice, so please review carefully and correct if necessary.
- Confirm that your household’s assets and expenses, if any, are listed correctly.
- Confirm that your household members’ collective criminal history is correct.
- Occasionally, a household will generate a consent form for everyone over 18 to sign alongside your Annual Recertification documentation. If it generates, it will be two additional pages at the end of the Annual Recertification Summary in the Household Documents section.
- If it does not generate and your household has not signed this form before, you may be asked to sign it separately and upload it in the Documents section. This can be done at a later time and may not be necessary; you may either reach out to or wait for communication from your MPHA tech or caseworker for advice on what to do.
- The Head of Household’s social security number will automatically generate, so the only thing needed to do is to click the Sign and Date buttons and confirm the signatures.
- Whichever adult household member is listed second in the Household Members section of the Annual Recertification will have their signature and date blanks generate in the ‘Spouse’ section. Do not worry if you are not the Head of Household’s married partner. This is a known quirk in the code and will not impact your recertification process.
- Member documents:
- The Head of Household has a special form to sign which allows MPHA to contact any emergency contacts you may have chosen to list.
- If you added or confirmed an emergency contact in your Annual Recertification, make sure that the identifying information generated on this form is correct.
- If you do not have any emergency contacts with MPHA, make sure that this box is checked.
- Once all sections of your Annual Recertification are completed and all signatures are added to your final page documents, wait for the page to load until the Application Progress bar reads 100% and there is a green checkmark in the middle of the page.
- Once you see the green checkmark, your Annual Recertification is complete! If you need to add additional documentation, you will still be able to do so, but you are otherwise finished with this process.
- If your document is not yet on this device, make sure it is downloaded or saved to this device first.
- Click the yellow ‘Upload’ button next to the specific document you want to upload and click the gray ‘Choose Files’ button in the middle of the pop-up window’s file bar.
- From there, your device will open up a file explorer and navigate to where you saved the documents you want to upload. You can upload documents one by one or in groups of multiple files at once depending on your preference. If you want to upload more than one file, make sure everything you want to upload is selected before you confirm the upload.
- Double-check that the file name showing is correct before you press ‘Upload.’ If you are uploading more than one file at the time, only the first file selected will be named.
- Wait for the page to finish processing and for the banner at the top to turn green.
- If your upload worked, you should see an upload date. There may also be an option to view the document you uploaded to check that it looks good.

- Adding single pages with photo:
- Select ‘Upload’ and ‘Choose Files’, then ‘Take Photo.’
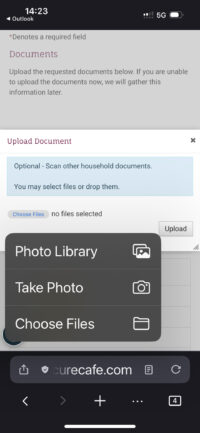
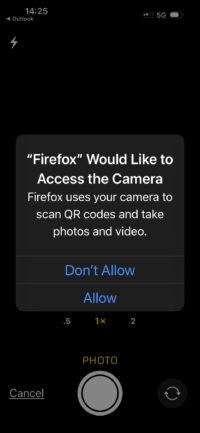
- Your browser (Safari, Chrome, Firefox, etc.) may ask you if you will allow it to access the camera on your device; select ‘Allow.’
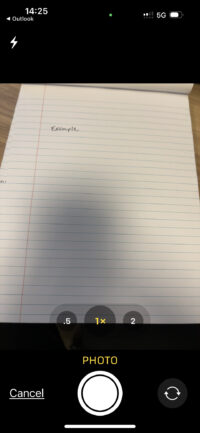
- Make sure your camera is pointed at the item you wish to upload and align it so that all of the relevant information is contained within the preview.
- As long as it is clear enough to read, it is good enough to upload.
- Wait for the image file to load before clicking ‘Upload’. Do not close the window; if you interrupt the processing request, the upload may not go through. If your internet connection is not strong enough to support the size of your file, you may need to try again later when you can access stronger Wi-Fi.
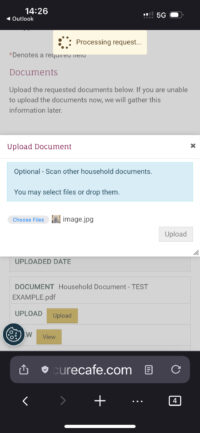
- You will know that your upload was successful if you see an Uploaded Date generated in the blank.
- If the yellow ‘View’ button is also available, click it and review the image quality to make sure that your MPHA tech or caseworker will be able to process it correctly.
- Select ‘Upload’ and ‘Choose Files’, then ‘Take Photo.’
- Adding multiple pages with photos:
- Select ‘Upload’ and ‘Choose Files’, then ‘Photo Library.’
- Find all of the photos you wish to upload and select them before pressing ‘Add’.
- Make sure the number of photos in the window matches how many you wanted to upload together. If it does, then select ‘Upload’ and wait for the page to reload on its own.
- All of your photos will be compiled together in a PDF when it’s finished processing the upload.
- Adding Files:
- If you are uploading a file, such as a PDF or word document, make sure that it is saved to your phone before you try to add it to your Annual Recertification. Once it’s saved, select ‘Upload’ and ‘Choose Files’, then ‘Take Photo.’
- Navigate to the correct file or files and then select everything you want to upload. The press ‘Open.’
- Make sure the number of files in the window matches how many you wanted to upload together. If it does, then select ‘Upload’ and wait for the page to reload on its own.